1
2
3
4
5
6
7
8
9
10
11
12
13
14
15
16
17
18
19
20
21
22
23
24
25
26
27
28
29
30
31
32
33
34
35
36
37
38
39
40
41
42
43
44
45
46
47
48
49
50
51
52
53
54
55
56
57
58
59
60
61
62
63
64
65
66
67
68
69
70
71
72
73
74
75
76
77
78
79
80
81
82
83
84
85
86
87
88
89
90
91
92
93
94
95
96
97
98
99
100
101
102
103
104
105
106
107
108
109
110
111
112
113
114
115
116
117
118
119
120
121
122
123
124
125
126
127
128
129
130
131
132
133
134
135
136
137
138
139
140
141
142
143
144
145
146
147
148
149
150
151
152
153
154
155
156
157
158
159
160
161
162
163
164
165
166
167
168
169
170
171
172
173
174
175
176
177
178
179
180
181
182
183
184
185
186
187
188
189
190
191
192
| Shader "Hidden/AtmosphericScattering"
{
Properties
{
_EarthRadius("EarthRadius",float)=1600
_AtmosphereHeight("AtmosphereHeight",float)=1000
_H("H0(大气平均密度所在的高度)",float)=2000
//_betaMie("β(λ)Mie",float)=0.9
_betaRL("β(λ)RL",float)=0.9
_SunColor("SunColor",Color)=(1,1,1,1)
}
SubShader
{
Tags { "LightMode" = "UniversalForward"}
LOD 100
Pass
{
HLSLPROGRAM
#pragma vertex vert
#pragma fragment frag
#include "Packages/com.unity.render-pipelines.universal/ShaderLibrary/Lighting.hlsl"
struct appdata
{
float4 vertex : POSITION;
float2 uv : TEXCOORD0;
};
struct v2f
{
float2 uv : TEXCOORD0;
float4 vertex : SV_POSITION;
//float4 rayVS:TEXCOORD1;
};
CBUFFER_START(UnityPerMaterial)
float _EarthRadius;
float _AtmosphereHeight;
float _H;
//float _betaMie;
float _betaRL;
half4 _SunColor;
CBUFFER_END
TEXTURE2D(_CameraDepthTexture); SAMPLER(sampler_CameraDepthTexture);
// float getLen2(float3 pos,float3 dir,float R,float3 centerPos)
// {
// float3 ACenter=centerPos-pos;
// float lenACenter=length(ACenter);
// float cosTheta=dot(normalize(ACenter),dir);
// //
// float lenAC=lenACenter*cosTheta;
// float lenO2C= sqrt(lenACenter*lenACenter-lenAC*lenAC);
// float lenA2C=sqrt(R*R-lenO2C*lenO2C);
// float lenAA2=lenA2C-lenAC;
// float lenBC=lenA2C;
// float AB=cosTheta>0?lenBC+lenAC:lenBC-lenAC;
// return AB;
// }
float getLen(float3 pos, float3 dir, float R,float3 centerPos)
{
float3 PO = centerPos - pos;
float lPO = length(PO);
float B = 2.0*dot(PO, dir);
float C = B*B - 4*(lPO*lPO-R*R);
float det = sqrt( max(0, C) );
//elsed: .5*(B+det)
float d = 0.5*(B-det);
float3 intersect = pos+d*dir;
return distance(intersect,pos);
}
v2f vert (appdata v)
{
v2f o;
o.vertex = TransformObjectToHClip(v.vertex);
o.uv = v.uv;
#if UNITY_UV_STARTS_TOP
o.uv.y=1-o.uv.y;
#endif
return o;
}
half4 frag (v2f i) : SV_Target
{
float depth = SAMPLE_TEXTURE2D(_CameraDepthTexture,sampler_CameraDepthTexture,i.uv);

float3 posWS=ComputeWorldSpacePosition( i.uv,depth, UNITY_MATRIX_I_VP);
//return half4(posWS,1);
//
float3 viewDir=_WorldSpaceCameraPos-posWS;
float viewLen=length(viewDir);
viewDir=-normalize(viewDir);
Light light=GetMainLight();
float3 lightDir=light.direction;
float LdotV=dot(lightDir,-viewDir);
float3 centerWS=float3(0,-_EarthRadius,0); //世界空间原点(0,0,0)作为表面起始位置,地心则在正下方R处
float maxStepCount=20;
float3 PPos=_WorldSpaceCameraPos;
//float PALen=getLen(PPos,viewDir,_AtmosphereHeight+_EarthRadius,centerWS);
float PALen=min(getLen(PPos,viewDir,_AtmosphereHeight+_EarthRadius,centerWS),LinearEyeDepth(depth,_ZBufferParams));
float3 stepRay=(viewDir*PALen)/maxStepCount;
float stepRaySize=length(stepRay);
float opticalDepthPA=0;
float T=0;
for(float k=0.5;k<maxStepCount;++k)
{
PPos=_WorldSpaceCameraPos+stepRay*k; //P步进
//==========DCP
float CPLen=getLen(PPos,lightDir,_AtmosphereHeight+_EarthRadius,centerWS);
//float3 CPos=PPos+lightDir*CPLen;
float3 stepCP=(lightDir*CPLen)/maxStepCount;
float stepCPSize=length(stepCP);
float opticalDepthCP=0;
for(float j=0.5;j<maxStepCount;++j)
{
float3 pos=PPos+stepCP*j;
float h=abs(length(pos-centerWS)-_EarthRadius);
opticalDepthCP+=exp(-(h/_H) )* stepCPSize ;
}
//============DCPEnd
//PA路径上
float PALen=distance(_WorldSpaceCameraPos,PPos);
float3 stepPA=PALen*viewDir/maxStepCount;
float stepPASize=length(stepPA);
float3 pSamplePos=PPos;
for(float g=0;g<maxStepCount;++g) //P
{
opticalDepthPA+=exp(-abs(length(PPos-centerWS)-_EarthRadius)/_H)*stepPASize;
pSamplePos+=stepPA;
}
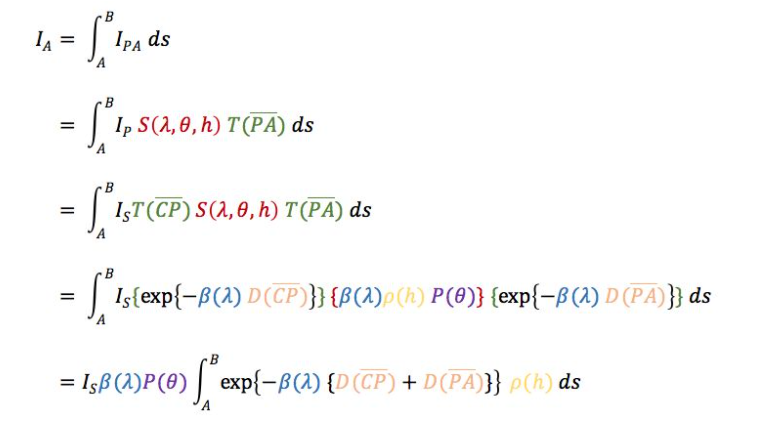
T+= exp(-_betaRL*(opticalDepthCP+opticalDepthPA))*exp(-abs(length(PPos-centerWS)-_EarthRadius)/_H)*stepRaySize; //T项
}
//相位函数
float phase=(3.0 / (16.0 * 3.1415926)) * (1.0+ (LdotV * LdotV));
float3 I_A=_SunColor.rgb*T*_betaRL*phase;
// return T;
return half4(I_A.rgb,1);
}
ENDHLSL
}
}
}
|