前言
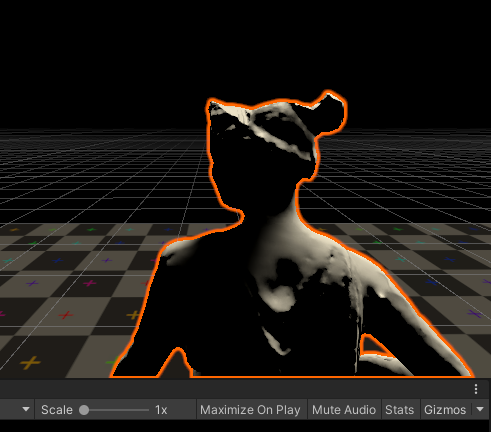
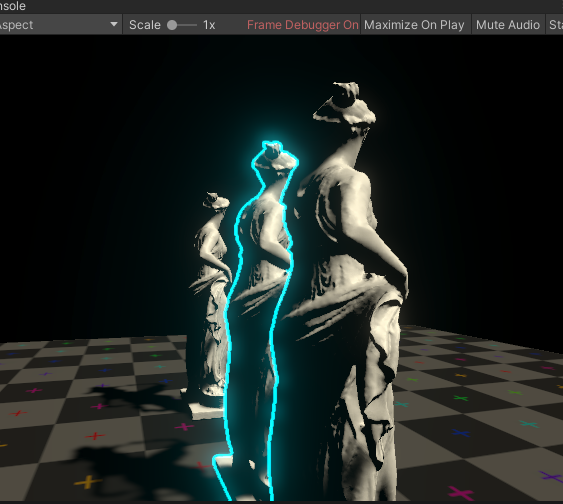
游戏中,我们常常能看到为了给玩家更好的选择反馈(知道自己到底选中的是哪个物体),会给角色一个描边,而且大部分DCC或者引擎都是在scene窗口选择会有描边,如下图:
但是这个描边常常都是只描角色轮廓,那么法线外扩/边缘光描边等等都实现不了这种效果,而纯屏幕空间描边也会有很多奇怪的描边,因为屏幕空间描边本身是基于高通滤波的,越高频越也就是越到了分界处越容易归到描边区。
那么如何才能只描轮廓线呢?所以我们显然需要再原本的屏幕空间的做法上做改进。
本篇内容难度相对其他的屏幕空间的效果来说,简直是张飞吃豆芽,而且由于实现这种效果会叒叒叒用到了rendererfeature,所以会更多重点放在思路以及rendererfeature相关内容上
原理
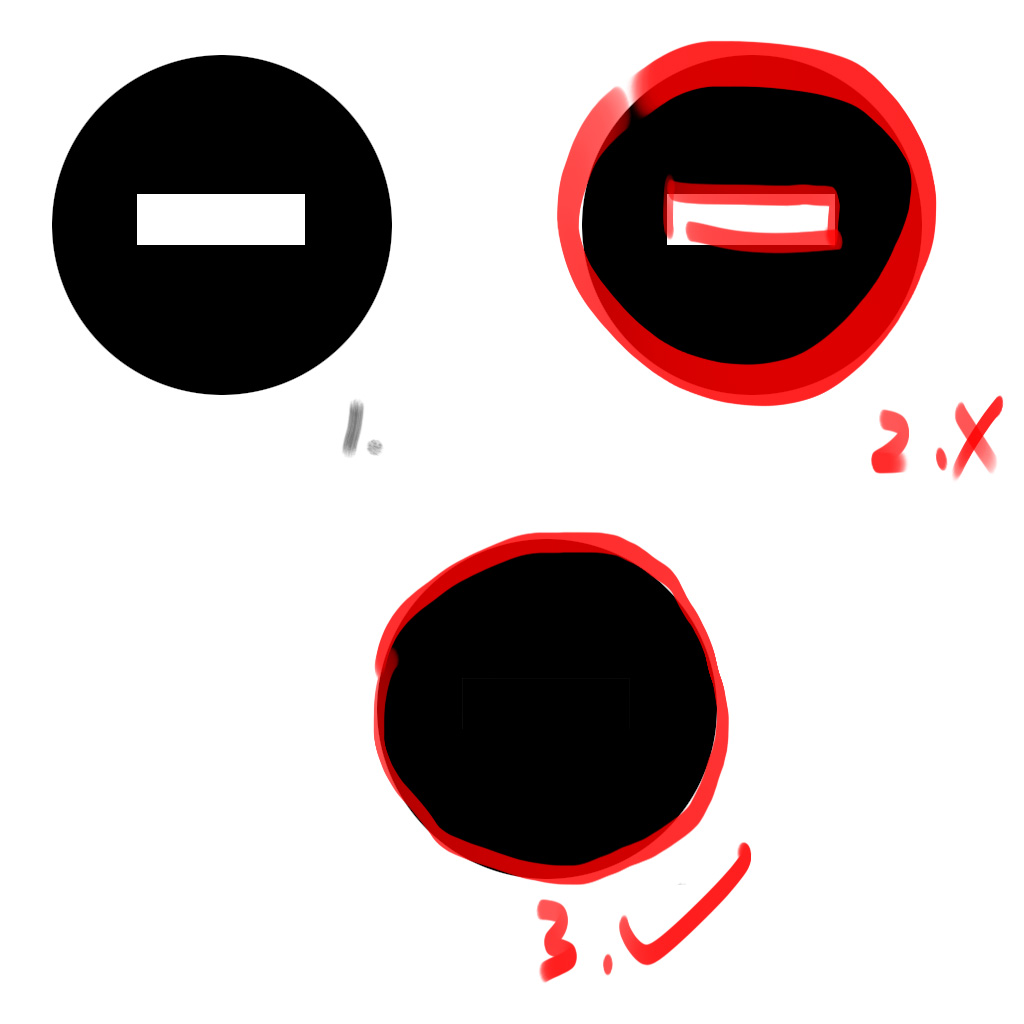
首先我们需要知道原理,为什么常规屏幕空间检测无法实现这种描边,以shader入门精要中的做法为例,用sobel算子算梯度,符合条件的就是边缘,如果内部有高频信息的出现,如下图2,会导致那一部分也会被检测出来导致被错误的描上了边。所以如图3,为了实现边缘的描边,我们只需要给物体一个纯色,那么描边岂不是轻而易举?而且纯色的加入导致也不需要sobel算子或者罗伯特算子了,因为这些算子是为了获得精确的边缘,而纯色本身就没什么误差,简单的计算几个方向的差,只要不是0就必然是边缘了。
总结一下,获得边缘描边分3步,1.获得屏幕上对应物体的RT给对应的物体一个纯色 2.描边 3.合并到屏幕RT
开搞开搞
又是rendererfeature
新建一个rendererfeature。之前的两篇屏幕空间反射讲了部分rendererfeature的基础,这次就跳过了。
1
2
3
4
5
6
7
8
9
10
11
12
13
14
15
16
17
18
19
20
21
22
23
24
25
26
[Serializable] public enum RTSize{ RT_128=1, RT_256 =2, RT_512 =3, RT_1024 =4, } [Serializable] public class SSOutlineSettings { [Header("Render Params")] public RTSize RTSize = RTSize.RT_512; public LayerMask HitLayer; public Material SSOutlineMaterial; [Range(0, 5000)] public int QueueMin = 1000; [Range(0, 5000)] public int QueueMax = 3000; public RenderPassEvent RenderPassEvent = RenderPassEvent.AfterRenderingTransparents; [Space(10)] [Header("EdgeDetect Params")] public float EdgeDetectSampleDistance=1; [ColorUsage(true, true)] public Color EdgeColor = Color.white; }
首先是面板需要暴露的参数准备一下,其中RTSize是因为本身描边不一定需要和屏幕RT一样的分辨率,可以适当降分辨率节省性能。Layermask是为了指定对应需要渲RT的Layer,另外的几个参数和layermask一样都是为了context.draw准备的,是画RT的必要设置。EdgeDetectSampleDistance是偏移的长度因子,偏移的越大那就导致边缘检测描边长度会增加。
1
2
3
4
5
6
7
8
9
10
11
12
13
14
15
16
17
18
19
20
21
22
23
24
25
26
27
28
29
30
31
32
33
public void Setup(ScriptableRenderer renderer) { dest = renderer.cameraColorTarget; } public CustomRenderPass(SSOutlineSettings ssOutlineSettings) { this.ssOutlineSettings = ssOutlineSettings; RenderQueueRange renderQueueRange = new RenderQueueRange(ssOutlineSettings.QueueMin, ssOutlineSettings.QueueMax); ssOutlineFilteringSettings = new FilteringSettings(renderQueueRange, ssOutlineSettings.HitLayer); this.renderPassEvent = ssOutlineSettings.RenderPassEvent; } public override void Configure(CommandBuffer cmd, RenderTextureDescriptor cameraTextureDescriptor) { cameraDescriptor=cameraTextureDescriptor; aspect = (float)Screen.width / Screen.height; SSOutlineTexureID = Shader.PropertyToID( "_SSOutlineTexure"); EdgeTexureID = Shader.PropertyToID("_EdgeDetectTexture"); rtSize =128<<(int)(ssOutlineSettings.RTSize-1); descriptor = new RenderTextureDescriptor(Mathf.CeilToInt(rtSize * aspect), rtSize, RenderTextureFormat.R8, 8); //depthBufferBits必须加上 否则会出现排序问题 cmd.GetTemporaryRT(SSOutlineTexureID, descriptor, FilterMode.Bilinear); ConfigureTarget(SSOutlineTexureID); ConfigureClear(ClearFlag.All, Color.black); }
因为这里分辨率我们不一定是用的相机分辨率,这就导致了我们不能用相机的RenderTextureDescriptor,所以需要自己构建一个Descriptor用于创建临时RT(里面有个坑,那就是depthBufferBits,平时习惯用相机的RenderTextureDescriptor,这次一开始写的时候没填depthBufferBits,没有报错但是最后的结果会有排序问题,估计是不填不会绑定深度图导致排序和drawcall先后顺序有关)。
1
2
3
4
5
6
7
public override void Execute(ScriptableRenderContext context, ref RenderingData renderingData) { DrawSSOutlineTexture(context,ref renderingData);//只渲染对应layer的黑底白图用于边缘检测 DoEdgeDetect(context); //边缘检测 DoMerge(context); //合并 }
接着我们开始写核心逻辑,execute函数是自定义渲染的入口。
纯色buffer
先开搞角色白色黑底的RT,我们指定一个layer,包含在FilteringSettings中,不符合FilteringSettings的都会被过滤掉。临时RT只画这个layer:
1
2
3
4
5
6
7
8
9
10
11
12
13
14
15
16
17
18
#region 只渲染hitlayer层 void DrawSSOutlineTexture(ScriptableRenderContext context, ref RenderingData renderingData) { CommandBuffer cmd = CommandBufferPool.Get("Draw SSOutline Texture"); using (new ProfilingScope(cmd, new ProfilingSampler("Draw SSOutline Texture"))) { drawingSettings = CreateDrawingSettings(ssOutlineTagID, ref renderingData, SortingCriteria.CommonOpaque); drawingSettings.overrideMaterial = ssOutlineSettings.SSOutlineMaterial; drawingSettings.overrideMaterialPassIndex = 0; context.DrawRenderers(renderingData.cullResults, ref drawingSettings, ref ssOutlineFilteringSettings); } context.ExecuteCommandBuffer(cmd); CommandBufferPool.Release(cmd); } #endregion
对应的shader为
1
2
3
4
5
6
7
8
9
10
11
12
13
14
15
16
17
18
19
20
21
22
23
24
25
26
27
28
29
30
31
32
33
34
35
36
37
38
39
40
41
42
43
44
45
46
47
48
49
50
51
52
53
54
//======================================================0 Pass { Tags { } //Pass 0 HLSLPROGRAM #pragma vertex vert #pragma fragment frag struct appdata { float4 vertex : POSITION; float2 uv : TEXCOORD0; }; struct v2f { float2 uv : TEXCOORD0; #ifdef ENABLE_DEPTH_CULLING float4 ScreenPos:TEXCOORD1; #endif float4 vertex : SV_POSITION; }; CBUFFER_START(UnityPerMaterial) CBUFFER_END TEXTURE2D(_MainTex); SAMPLER(sampler_MainTex); TEXTURE2D(_CameraDepthTexture); SAMPLER(sampler_CameraDepthTexture); v2f vert (appdata v) { v2f o; o.vertex = TransformObjectToHClip(v.vertex); o.uv =v.uv; return o; } half4 frag (v2f i) : SV_Target { half4 col = 1; return col; } ENDHLSL }
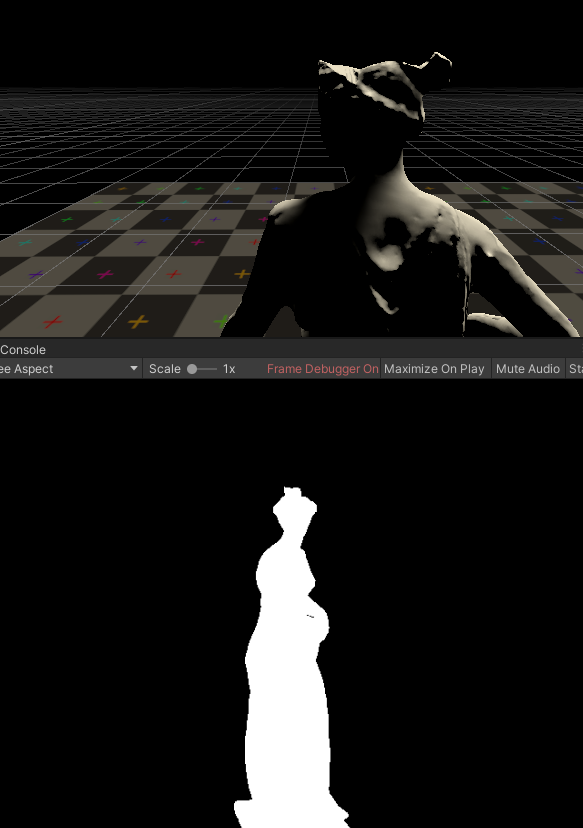
frameDebug一下康康
ok,没问题!
开始边缘检测
1
2
3
4
5
6
7
8
9
10
11
12
13
14
15
16
17
18
19
20
21
22
23
24
#region 边缘检测 void DoEdgeDetect(ScriptableRenderContext context) { CommandBuffer cmd = CommandBufferPool.Get("Final SSOutline"); using (new ProfilingScope(cmd, new ProfilingSampler("Final SSOutline"))) { descriptor.colorFormat = RenderTextureFormat.ARGB32; descriptor.msaaSamples = UniversalRenderPipeline.asset.msaaSampleCount; cmd.GetTemporaryRT(EdgeTexureID, descriptor, FilterMode.Bilinear); ssOutlineSettings.SSOutlineMaterial.SetFloat("_SampleDistance", ssOutlineSettings.EdgeDetectSampleDistance); //ssOutlineSettings.SSOutlineMaterial.SetFloat("_Treshold", ssOutlineSettings.Treshold); ssOutlineSettings.SSOutlineMaterial.SetColor("_OutlineColor", ssOutlineSettings.EdgeColor); cmd.Blit(SSOutlineTexureID, EdgeTexureID,ssOutlineSettings.SSOutlineMaterial,1); cmd.SetGlobalTexture("_EdgeDetectTexture", EdgeTexureID); cmd.ReleaseTemporaryRT(EdgeTexureID); } context.ExecuteCommandBuffer(cmd); CommandBufferPool.Release(cmd); } #endregion
shader对应部分为
1 2 3 4 5 6 7 8 9 10 11 12 13 14 15 16 17 18 19 20 21 22 23 24 25 26 27 28 29 30 31 32 33 34 35 36 37 38 39 40 41 42 43 44 45 46 47 48 49 50 51 52 53 54 55 Pass { HLSLPROGRAM #pragma vertex vert #pragma fragment frag struct appdata { float4 vertex : POSITION; float2 uv : TEXCOORD0; }; struct v2f { float2 uv : TEXCOORD0; float4 uv_offset:TEXCOORD1; float4 vertex : SV_POSITION; }; CBUFFER_START(UnityPerMaterial) float2 _MainTex_TexelSize; float _SampleDistance; float4 _OutlineColor; CBUFFER_END TEXTURE2D(_MainTex); SAMPLER(sampler_MainTex); v2f vert (appdata v) { v2f o; o.vertex = TransformObjectToHClip(v.vertex); o.uv =v.uv; o.uv_offset.xy=o.uv+float2(-_MainTex_TexelSize.x,-_MainTex_TexelSize.y)*_SampleDistance; o.uv_offset.zw=o.uv+float2(_MainTex_TexelSize.x,-_MainTex_TexelSize.y)*_SampleDistance; return o; } half4 frag (v2f i) : SV_Target { half col1 = SAMPLE_TEXTURE2D(_MainTex,sampler_MainTex,i.uv).r; half col2 = SAMPLE_TEXTURE2D(_MainTex,sampler_MainTex,i.uv_offset.xy).r; half col3 = SAMPLE_TEXTURE2D(_MainTex,sampler_MainTex,i.uv_offset.zw).r; half diff = abs (col1*2 -col2-col3); half4 outline=_OutlineColor*diff; return outline; } ENDHLSL }
这里就是用了之前说的,因为是纯色没什么检测上的难度,最简单的三个点做个差就拿下了。
merge!
1
2
3
4
5
6
7
8
9
10
11
12
13
14
15
16
17
18
19
20
21
#region merge void DoMerge(ScriptableRenderContext context) { CommandBuffer cmd = CommandBufferPool.Get("SSOutline Merge"); using (new ProfilingScope(cmd, new ProfilingSampler("SSOutline Merge"))) { int mergeID=Shader.PropertyToID("_MergeRT"); cmd.GetTemporaryRT(mergeID,cameraDescriptor,FilterMode.Bilinear); cmd.Blit(dest, mergeID, ssOutlineSettings.SSOutlineMaterial, 2); cmd.Blit(mergeID,dest); cmd.ReleaseTemporaryRT(mergeID); } context.ExecuteCommandBuffer(cmd); CommandBufferPool.Release(cmd); } #endregion
1
2
3
4
5
6
7
8
9
10
11
12
13
14
15
16
17
18
19
20
21
22
23
24
25
26
27
28
29
30
31
32
33
34
35
36
37
38
39
40
41
42
43
44
Pass { HLSLPROGRAM #pragma vertex vert #pragma fragment frag struct appdata { float4 vertex : POSITION; float2 uv : TEXCOORD0; }; struct v2f { float2 uv : TEXCOORD0; float4 vertex : SV_POSITION; }; TEXTURE2D(_MainTex); SAMPLER(sampler_MainTex); TEXTURE2D(_EdgeDetectTexture); SAMPLER(sampler_EdgeDetectTexture); v2f vert (appdata v) { v2f o; o.vertex = TransformObjectToHClip(v.vertex); o.uv =v.uv; return o; } half4 frag (v2f i) : SV_Target { half4 oringinCol = SAMPLE_TEXTURE2D(_MainTex,sampler_MainTex,i.uv); half4 edgeCol=SAMPLE_TEXTURE2D(_EdgeDetectTexture,sampler_EdgeDetectTexture,i.uv); half3 col=lerp(oringinCol.rgb,edgeCol.rgb,edgeCol.a); return half4(col,1 ); } ENDHLSL }
处理问题
深度剔除问题
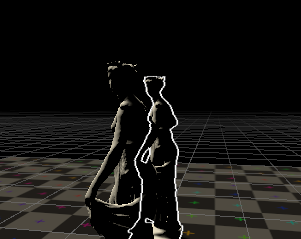
以上我们做了一个最基础的版本,但是存在不少问题,首先是因为我们画RT不考虑深度剔除,会导致即使物体被挡住,也会画
所以我们需要加入一个基于深度图采样的剔除功能解决方岸,而如果使用了深度图,那么需要我们的RT也具有摄像机相同的分辨率像素需要完全对应。
HDR支持
一般来说描边如果支持HDR会使得选择更加显眼,同样HDR+Bloom自带模糊,能让本来就精度不高的描边锯齿感弱化,同样,为了减少锯齿RT会开启MSAA
解决方案
1
2
3
4
5
6
7
8
9
10
11
12
13
14
15
16
17
18
19
20
21
22
23
24
25
26
27
28
29
30
31
32
33
34
35
36
37
38
39
[Serializable] public enum DepthCullingMode { RTSizeSameToOpaqueTex_HighQuality=1, ForceUseRTSize=2, NoCulling = 3, } [Serializable] public enum RTSize{ RT_128=1, RT_256 =2, RT_512 =3, RT_1024 =4, } [Serializable] public class SSOutlineSettings { [Header("Render Params")] public RTSize RTSize = RTSize.RT_512; public LayerMask HitLayer; public Material SSOutlineMaterial; [Range(0, 5000)] public int QueueMin = 1000; [Range(0, 5000)] public int QueueMax = 3000; public RenderPassEvent RenderPassEvent = RenderPassEvent.AfterRenderingTransparents; [Space(10)] [Header("EdgeDetect Params")] public float EdgeDetectSampleDistance=1; //[Range(0, 1)] public float Treshold = 0.1f; [ColorUsage(true, true)] public Color EdgeColor = Color.white; public bool EnableHDREdgeColor = false; [Header("DepthCulling Params")] //public bool EnableDepthCulling = false; public float ZBias = 0.015f; public DepthCullingMode DepthCullingMode=DepthCullingMode.NoCulling; }
1
2
3
4
5
6
7
8
if (!((int)ssOutlineSettings.DepthCullingMode==1)) { descriptor = new RenderTextureDescriptor(Mathf.CeilToInt(rtSize * aspect), rtSize, RenderTextureFormat.R8, 8); //depthBufferBits必须加上 否则会出现排序问题 } else { descriptor=new RenderTextureDescriptor(Screen.width, Screen.height, RenderTextureFormat.R8, 8); //如果需要深度图做剔除遮挡像素,需要保持分辨率相等,否则会有分辨率问题导致的边缘错误 }
1
2
3
4
5
6
7
8
9
10
11
12
13
14
15
16
17
18
19
20
21
22
23
24
25
#region 只渲染hitlayer层 void DrawSSOutlineTexture(ScriptableRenderContext context, ref RenderingData renderingData) { CommandBuffer cmd = CommandBufferPool.Get("Draw SSOutline Texture"); using (new ProfilingScope(cmd, new ProfilingSampler("Draw SSOutline Texture"))) { if((int)ssOutlineSettings.DepthCullingMode==1|| (int)ssOutlineSettings.DepthCullingMode == 2 ) { ssOutlineSettings.SSOutlineMaterial.EnableKeyword("ENABLE_DEPTH_CULLING"); } else { ssOutlineSettings.SSOutlineMaterial.DisableKeyword("ENABLE_DEPTH_CULLING"); } drawingSettings = CreateDrawingSettings(ssOutlineTagID, ref renderingData, SortingCriteria.CommonOpaque); drawingSettings.overrideMaterial = ssOutlineSettings.SSOutlineMaterial; drawingSettings.overrideMaterialPassIndex = 0; context.DrawRenderers(renderingData.cullResults, ref drawingSettings, ref ssOutlineFilteringSettings); } context.ExecuteCommandBuffer(cmd); CommandBufferPool.Release(cmd); }
1
2
3
4
5
6
7
8
9
10
11
12
13
14
15
16
17
18
19
20
21
22
23
24
25
26
27
28
29
30
31
32
33
34
#region 边缘检测 void DoEdgeDetect(ScriptableRenderContext context) { CommandBuffer cmd = CommandBufferPool.Get("Final SSOutline"); using (new ProfilingScope(cmd, new ProfilingSampler("Final SSOutline"))) { if ((int)ssOutlineSettings.DepthCullingMode==1) { descriptor.width = Mathf.CeilToInt(rtSize * aspect); descriptor.height = rtSize; } if (ssOutlineSettings.EnableHDREdgeColor) { descriptor.colorFormat = RenderTextureFormat.ARGBHalf; } else { descriptor.colorFormat = RenderTextureFormat.ARGB32; } descriptor.msaaSamples = UniversalRenderPipeline.asset.msaaSampleCount; cmd.GetTemporaryRT(EdgeTexureID, descriptor, FilterMode.Bilinear); ssOutlineSettings.SSOutlineMaterial.SetFloat("_SampleDistance", ssOutlineSettings.EdgeDetectSampleDistance); //ssOutlineSettings.SSOutlineMaterial.SetFloat("_Treshold", ssOutlineSettings.Treshold); ssOutlineSettings.SSOutlineMaterial.SetColor("_OutlineColor", ssOutlineSettings.EdgeColor); cmd.Blit(SSOutlineTexureID, EdgeTexureID,ssOutlineSettings.SSOutlineMaterial,1); cmd.SetGlobalTexture("_EdgeDetectTexture", EdgeTexureID); cmd.ReleaseTemporaryRT(EdgeTexureID); } context.ExecuteCommandBuffer(cmd); CommandBufferPool.Release(cmd); } #endregion
对应的纯色RT深度检测部分shader,做一个深度比较,但是受限于精度,我们和shadowmap一样引入bias来减少瑕疵
1
2
3
4
5
6
7
8
9
10
11
12
13
14
15
16
17
18
19
20
21
22
23
24
25
26
27
28
29
30
31
32
33
34
35
36
v2f vert (appdata v) { v2f o; o.vertex = TransformObjectToHClip(v.vertex); o.uv =v.uv; #ifdef ENABLE_DEPTH_CULLING o.ScreenPos=ComputeScreenPos(o.vertex); o.ScreenPos.z=-mul(UNITY_MATRIX_V,mul(UNITY_MATRIX_M,v.vertex)).z; #endif return o; } half4 frag (v2f i) : SV_Target { half4 col = 1 ; #ifdef ENABLE_DEPTH_CULLING float depth=SAMPLE_TEXTURE2D(_CameraDepthTexture,sampler_CameraDepthTexture,i.ScreenPos.xy/i.ScreenPos.w).r; depth=LinearEyeDepth(depth,_ZBufferParams); col=abs (i.ScreenPos.z-depth)<_ZBias*depth?1 :0 ; #endif return col; } ENDHLSL }
芜湖!问题就解决了。
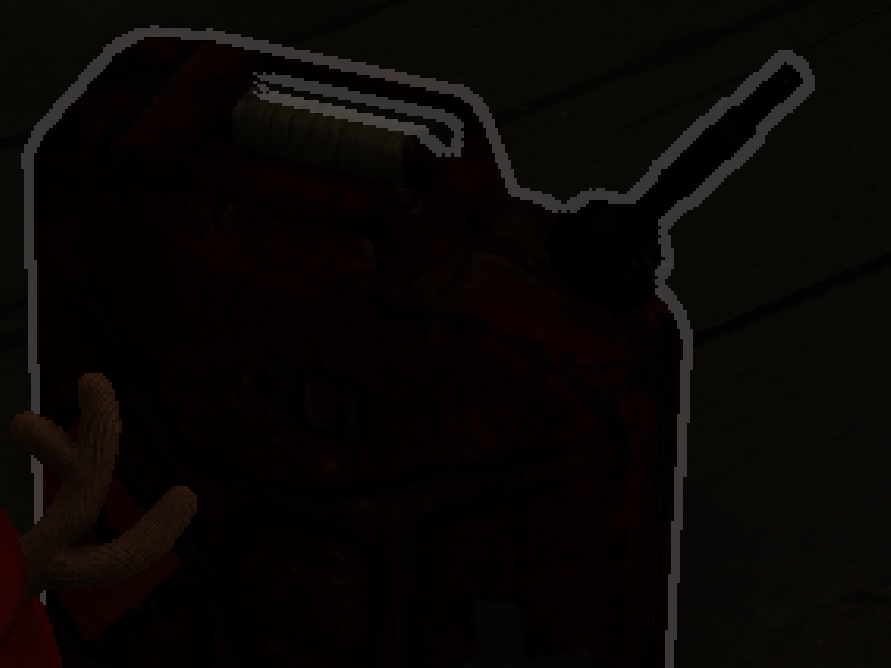
再提一嘴
吃鸡里的描边和这个类似但不完全一样,就一个地方有区别,眼尖的旁友估计已经发现了,他们被遮挡的部分轮廓不会描边出来,这是因为他们是在描边那个部分做的深度检测,也是就是在第二个Pass做的,把深度未通过的直接pass了,而我们在RT的时候pass了被遮挡的部分,导致了这部分依然会被描出来,但是吃鸡这种做法代价是多一个通道存自己的深度,开销多一点,这得看项目的取舍了。